

We have a special visit planned to Stonehenge on our trip as well. You can still walk inside the stone circle you if plan far enough in advance. But, before touring the stones, I really wanted the kids to understand what the henge was all about.
We started by gathering a ton of books from our library and several DVDs on Stonehenge. The kids learned how it might have been built and examined the map of the stones as they remain today. We also discussed the many reasons why it might have been built.
Next, we started brainstorming about building our own Stonehenge. What could we use to make a model of it?
- Legos
- Marshmellows
- Rice Crispy Treats
- Wine Corks
- Water Bottles
- Toliet Paper Rolls


/a>
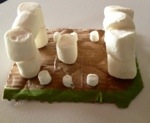

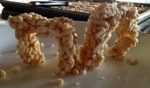
So we set about putting our ideas in action. May favorite was “Wine Henge” as we started calling it. I am astounded at the time Cinco took to study the current placement of the stones and to really plot out the henge as t looks today. If you want to make your own “Wine Henge” here’s how to get started:
You will need:
- Lots of Wine Corks (Try to get the ones still made of cork not plastic)
- Large piece of Card Board
- Gray Spray Paint
- Green Paint
- A Knife
- A Glue Gun
Step 1: Cut the wine corks into long rectangles, This means you will need to shave off two sides of the cork. It is best to have an adult do this! Real cork is easier to cut than the newer plastic corks. Don’t throw out the extra bits. You can use these for some of the fallen stones or the “blue stones”.
Step 2: Spray paint the corks. You will need to spray paint one side, let it dry and then flip the corks and paint the other side.
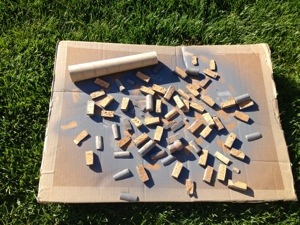
Step 3: Paint your large piece of card board green and let dry.

Step 3: Get a good picture of Stonehenge and start studying. This is a good time to talk with kids about how the henge was made and why. When the corks and board are dry, use the picture to lay out the stones. I highly recommend laying out the stones before you glue. You will want to make sure your stone spacing is correct so you do not end up with gaps that look funny.
Step 4: Using the hot glue gun, glue the stones in place. I recommend an adult do this part unless the student is older can be trusted with the hot glue.

Getting a little more creative we also used the left overs to design our own original henge. After all, there are tons of henges in Britain and not all look exactly like Stonehenge.
If you are looking for other Stonehenge resources, we had fun with the following worksheets fro English Heritage:


